For more information about downloading and installing Zoom, please see the Install guide.
Want to make sure that your meetings are secure? Please read the Best Practices for invitations guide.
Log in to Zoom with your UiO user name and password
IMPORTANT SECURITY INFORMATION: All students and staff at UiO are licensed to use the full version of Zoom, where privacy and security standards are higher than in the free version of Zoom, and the UiO Zoom adminsitrator has made key settings to further enhance security. It is important that everyone at the UiO install Zoom and log in with their UiO username and password as described in the Install guide. If you are uncertain as to whether you are logged in to UiO Zoom, or not, here is how to check if you're signed in to UiO Zoom.
Creating a meeting and inviting participants from Zoom
You can plan and invite to meetings from Zoom or Outlook. Here you'll learn how to use Zoom for the planning and creation of the meeting:
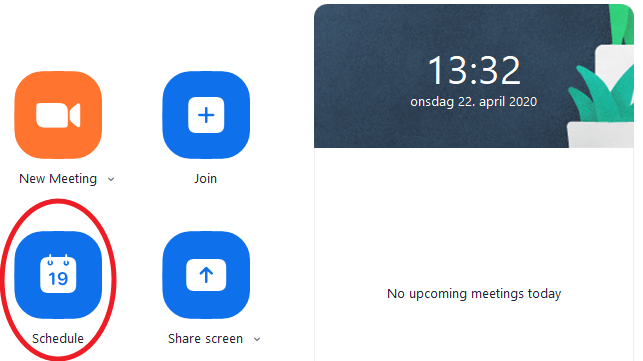
1. Open Zoom.
2. Click the Schedule button on the start screen.
3. The Schedule Meeting window opens. Here you have a number of choices and options to set. Some options have a default setting which is set by the central UiO Zoom administrator for security reasons. All options are reviewed below, and we request that you retain the default settings where they are justified for security reasons.
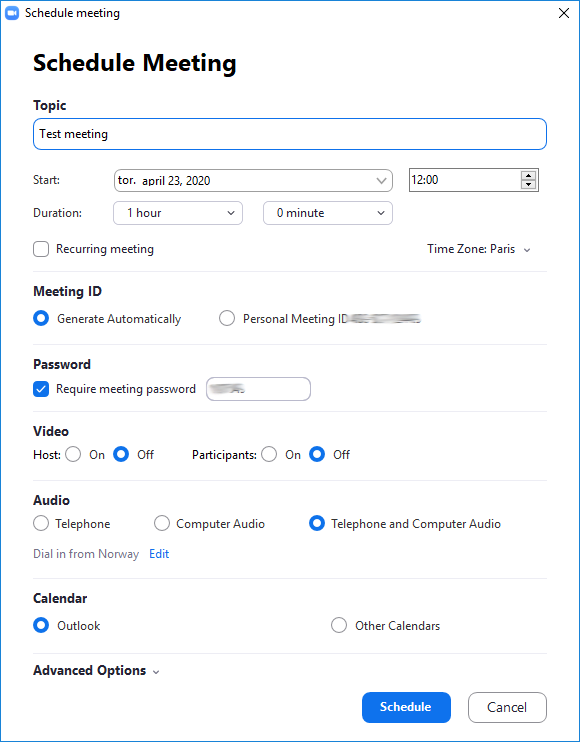
The options in the Schedule Meeting window:
Topic: Give the meeting av name / set a topic for the meeting
Start and Duration: Set date, mine and duration for the meeting.
Recurring meeting: If you are creating meeting that is repeated for example once a week or similar, select this check box. You will then be asked to fill in the repeat information in the calendar invitation when it opens at the end of the scheduling process.
Meeting ID: Generate automatically is set by default for security reasons. With this option, Zoom creates a new meeting ID that is only used for this meeting, which provides increased security. You should not share meeting IDs on social media or other open forums, as you will quickly lose control over who can show up at the meeting, and the chance of zoom bombing and other unwanted events increases. The Personal Meeting ID is the meeting ID of your personal Zoom room that is always there. If someone knows this ID, they can also come to your meeting room when you hold meetings they are not invited to. Meetings in such personal rooms have lower security than meetings with generated ID.
Password: For security reasons, we recommend that you password protect your meetings. It increases security and reduces the possibility that robots and other automated activities can access your meeting. The password appears in the meeting invitation you send out, but you can and choose to send out the meeting invitation and password separately. We will return to that below.
Video: Here you specify whether you as the host for the meeting and the participants should have video turned on when you enter the meeting. For security reasons, we recommend that video is turned off when participants enter the meeting. Participants can turn on video for themselves when they are in the meeting. To do this, move the cursor to the bottom of the screen (when the meeting is in progress) and click on the camcorder icon there. You, as the host (host) for the meeting, can turn on and off video for the participants.
Audio: Here you specify what kind of source the participants have for sound. The default setting is Telephone and Computer Audio. Most people will probably attend the meeting from a computer that has a microphone, so it is often enough to choose Computer Audio, but you may want to keep the default setting and allow participants to call the meeting and participate with audio over the phone. We do not recommend selecting Telephone only for audio.
Calendar: Here you specify whether you want the invitation to be sent from Outlook or another calendar. Your choice here depends on which calendar you use on the computer you are creating the meeting from.
Advanced options
Click Advanced options at the bottom of the Schedule Meeting window to view more important settings.

Allow participants to join anytime: For security reasons, Allow participants to join anytime is unselected by default. When you choose not to allow participants to join at any time, the host must let the meeting participants into the meeting. When the participants click on the link to attend the meeting, they do not enter the meeting directly, but must wait to be admitted. This way, as a host, you have better control over who actually enters the meeting and you reduce the possibility of unwanted participants and, for example, Zoom bombing.
Mute participants on entry: Here you specify whether the participants should have the microphone switched off when they enter the meeting. It may be convenient to have the microphone muted when participants enter the meeting to avoid noise. Participants can turn on the microphone themselves when inside the meeting. To do this, move the cursor to the bottom of the screen (when the meeting is in progress) and click on the microphone icon there. You as host for the meeting can also turn the microphone on and off for the participants.
Automatically record meeting on the local computer: If you select this option, recording of the meeting will start automatically when you arrive as host. Recording can also be started manually when the meeting is in progress. Remember Rules for recording lectures and other events at the UiO.
Enable focus mode when meeting starts: By selecting this option, focus mode will turn on once the meeting starts. This means participants will only be able to see hosts' videos, shared content, and videos of spotlighted participants as long as focus mode is enabled. You can choose to disable focus mode at any time during the meeting.
Approve or block entry for user from specific countries/regions: This option enables you to control which users are allowed to join the meeting based on their country/region.
4. When you have set the options you need, click Schedule. If you are using Outlook, the meeting invitation opens in Outlook and you can send it from there.
If you do not use Outlook, the information the participants need to join the meeting appears in a new window, and you can copy the information into an email and send it to those you want to invite. If you forget to send the invitation to one or more people, all you have to do is forward the invitation you have already sent. To attend a meeting, all the participants need is the Meeting ID, or the link for Join Zoom Meeting, possibly together with the password for the room.
5. In Outlook, enter the those you want to invite in the To field as in a regular Outlook invitation, and fix other settings, such as whether the meeting is repeating, to be displayed as private or otherwise. In the Location field, where you usually find a meeting room, the URL of the Zoom meeting is often displayed. The URL of the Zoom meeting should not be displayed in the calendars, so you should delete it from the location field and replace it with "Zoom Meeting" or similar.
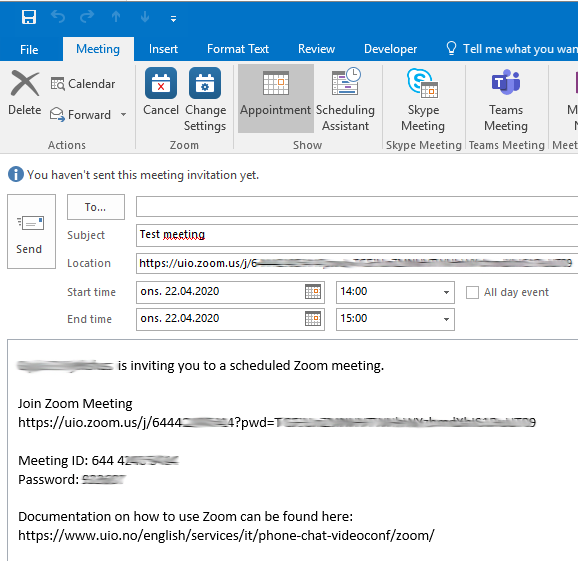
In the invitation body, there is some default text. You should not delete it, but rather enter information about the meeting before (above) the existing text explaining how to participate in the meeting from different platforms. At the UiO, for most people it is enough to just click on the URL after "Join meeting". If your meeting is password protected, the password will be part of the meeting link. A link to a password-protected meeting might look like this:
https://uio.zoom.us/j/66xx283x085?pwd=bC9FxxxxxxXVFTkxaVxxxxxx.
If you want to send out the meeting link and password separately, copy the link and delete everything after the question mark. Then you can send out the link, and send out the password only to those in the target group for the meeting. In most cases, it is OK to send a link and password in the same e-mail to UiO participants.
6. When you are finished with the e-mail containing the invitation, and the correct recipients have been entered, click Send. The meeting is ready. As a host (meeting leader) you use the same link as other participants to enter the meeting.
How to use Outlook to schedule a meeting in Zoom
You can create and send invitations to Zoom meetings directly from Outlook. Before you do, you'll need the Outlook add-on to Zoom. For UiO managed computers, the add-on is preinstalled.
Installing the Outlook add-on
The add-on for Microsoft Outlook should be installed by default on all UiO managed Windows desktops and Macs. If you have a managed Windows or Mac and don't have the Outlook plugin, consult your local IT department for assistance.
Not sure if you have the Outlook plugin for Zoom? Look at the picture below. If you have the two buttons marked with a red ring, you have the Outlook plugin for Zoom. If you don't have the buttons or they look different, you can download Outlook-plugin fra Zoom.
To create and invite to a meeting:

- Open Outlook and find the Zoom buttons in the upper left of the Outlook menu bar. You have two choices: "Schedule a meeting" (to invite to meetings in the future) or "Start Instant Meeting".
- Select "Schedule a meeting"
- A "Zoom - Schedule meeting" window opens with your meeting calendar in Outlook. Here you can edit the settings for the Zoom meeting before sending the invitation. All options are reviewed below, and we request that you retain the default settings where they are justified for security reasons.

The options in the Schedule Meeting window:
Meeting ID: Generate automatically is set by default for security reasons. With this option, Zoom creates a new meeting ID that is only used for this meeting, which provides increased security. You should not share meeting IDs on social media or other open forums, as you will quickly lose control over who can show up at the meeting, and the chance of zoom bombing and other unwanted events increases. The Personal Meeting ID is the meeting ID of your personal Zoom room that is always there. If someone knows this ID, they can also come to your meeting room when you hold meetings they are not invited to. Meetings in such personal rooms have lower security than meetings with generated ID.
Password: For security reasons, we recommend that you password protect your meetings. It increases security and reduces the possibility that robots and other automated activities can access your meeting. The password appears in the meeting invitation you send out, but you can and choose to send out the meeting invitation and password separately. We will return to that below.
Video: Here you specify whether you as the host for the meeting and the participants should have video turned on when you enter the meeting. For security reasons, we recommend that video is turned off when participants enter the meeting. Participants can turn on video for themselves when they are in the meeting. To do this, move the cursor to the bottom of the screen (when the meeting is in progress) and click on the camcorder icon there. You, as the host (host) for the meeting, can turn on and off video for the participants.
Audio: Here you specify what kind of source the participants have for sound. The default setting is Telephone and Computer Audio. Most people will probably attend the meeting from a computer that has a microphone, so it is often enough to choose Computer Audio, but you may want to keep the default setting and allow participants to call the meeting and participate with audio over the phone. We do not recommend selecting Telephone only for audio.
Advanced options
Click Advanced options at the bottom of the Schedule Meeting window to view more important settings.
.png)
Allow participants to join anytime: For security reasons, Allow participants to join anytime is unselected by default. When you choose not to allow participants to join at any time, the host must let the meeting participants into the meeting. When the participants click on the link to attend the meeting, they do not enter the meeting directly, but must wait to be admitted. This way, as a host, you have better control over who actually enters the meeting and you reduce the possibility of unwanted participants and, for example, Zoom bombing.
Mute participants on entry: Here you specify whether the participants should have the microphone switched off when they enter the meeting. It may be convenient to have the microphone muted when participants enter the meeting to avoid noise. Participants can turn on the microphone themselves when inside the meeting. To do this, move the cursor to the bottom of the screen (when the meeting is in progress) and click on the microphone icon there. You as host for the meeting can also turn the microphone on and off for the participants.
Automatically record meeting on the local computer: If you select this option, recording of the meeting will start automatically when you arrive as host. Recording can also be started manually when the meeting is in progress. Remember Rules for recording lectures and other events at the UiO.
Enable focus mode when meeting starts: By selecting this option, focus mode will turn on once the meeting starts. This means participants will only be able to see hosts' videos, shared content, and videos of spotlighted participants as long as focus mode is enabled. You can choose to disable focus mode at any time during the meeting.
Include invite link in location field: This option is enabled by default and leaves the link to the meeting in the location field of the invitation.
Insert Zoom meeting invitation above existing text: Enabling this option inserts the invitation to the zoom meeting above the invitation text. Note that it is also possible to select the language for your meeting invitation.
Approve or block entry for user from specific countries/regions: This option enables you to control which users are allowed to join the meeting based on their country/region.
Alternative hosts: Here you can add another user who can host the meeting if you are prevented from attending or will arrive late. The user must have a UiO username and password. Enter the user on the form "username@uio.no"
4. When you have set the options you need, click Schedule. If you are using Outlook, the meeting invitation opens in Outlook and you can send it from there.
5. In Outlook, enter the people you want to invite in the To field as in a regular Outlook invitation, and fix other settings, such as whether the meeting is repeating, to be displayed as private or otherwise. In the Location field, where you usually find a meeting room, the Zoom meeting URL may be displayed. You should not display the meeting URL in your calendar, so you should delete and replace it with "Zoom Meeting" or similar.
In the invitation body, there is some default text. You should not delete it, but rather enter information about the meeting before (above) the existing text explaining how to participate in the meeting from different platforms. At the UiO, for most people it is enough to just click on the URL after "Join meeting". If your meeting is password protected, the password will be part of the meeting link. A link to a password-protected meeting might look like this:
https://uio.zoom.us/j/66xx283x085?pwd=bC9FxxxxxxXVFTkxaVxxxxxx.
If you want to send out the meeting link and password separately, copy the link and delete everything after the question mark. Then you can send out the link, and send out the password only to those in the target group for the meeting. In most cases, it is OK to send a link and password in the same e-mail to UiO participants.
6. When you are finished with the e-mail containing the invitation, and the correct recipients have been entered, click Send. The meeting is ready. As a host (meeting leader) you use the same link as other participants to enter the meeting.
- If you forgot to send the invite to one or more persons, you just need to forward the invite that you already sent. The only thing the participants needs to join the meeting is the Meeting ID alternatively together with the password you created for the room.
How to invite to an impulsive ("on the fly") Zoom meeting
Start by opening the Zoom App on your computer. If you don't have Zoom installed, please see our installation guide.
Creating a new meeting
- Click New Meeting to create a meeting room on the fly. This allows for quick and simple invites and meetings.


Inviting participants to your meeting
- At the bottom of the screen you will find a menu. Click on the Invite tab to start inviting people to join your meeting.

- Once you click Invite, Zoom offers multiple ways to invite participants. You could invite your contacts directly, invite them by email or simply Copy URL or Copy Invitation (found in the lower left corner). Copy URL will copy the join link and Copy Invitation will copy the full invitation text. You can then share the link or invitation however you like, for instance pasting it to someone through chat-applications or sharing on a website.
Can I see multiple meeting participants at the same time?
By default Zoom only shows the speaker, but one can enable "Gallery View" to get a wider overview of the participants in the meeting. How many people the "Gallery View" shows depends on the hardware of the machine that you run Zoom on.

How to avoid unwanted participants?
By default a meeting is open in the sense that anyone can join. There are several ways to protect your meeting. Sometimes you want to be absolutely sure that no new participants are allowed, but other times you may just want to avoid anyone stumbling into your meeting by accident. Below are a few steps you may take to avoid unwanted participants.
| Use generated meeting ID |
This is the weakest form of protection. When using your personal meeting ID, you may experience that people stumble into your meeting when they're not supposed to. One example can be if you have scheduled two consecutive meetings using your personal ID. Participants in arriving early for the second meeting may accidentally join the first if it hasn't ended. Use generated ID to get a random, unique ID for your meeting. Avoid using your personal ID as a general rule. |
| Password protection | You may set a password for your meeting when scheduling the meeting. Any participant must enter the password when joining. Consult the user documentation for details. |
| Waiting room | You may enable the waiting room feature in the meeting settings. This is partially useful when the same meeting room is used for several meetings in a short time-frame. Or when some participants shall join only a part of a meeting. The new participants will then be put in the waiting-room until a host admits them. They can also be put back in the waiting-room by the hosts. Consult the user documentation for details. More about the Waiting room feature. |
| Lock meeting |
As a host, you can lock the meeting at any time. Open the participants list and click on More at the bottom. Here you can lock the meeting and make sure no other participants can join.
|

How to password protect your meeting
You may set a password that the participants will have to enter before they can join the meeting. This may be useful if the topic is sensitive, or you wish to discuss something privately and want to ensure that only the invited persons are allowed inside the Zoom-room.
This possibility is listed under the meeting scheduler in both the Zoom application and in the Outlook add-in.

When the Outlook invitation is created you will see that the password has been included, and that a numeric password will have been generated for participants who use telephone audio.

A short guide to facilitating meetings
Get familiar with the host controls
This video from Zoom will give you quick introduction to the basic meeting controls available during Zoom meetings: how to mute or unmute your microphone, turn your video on or off, inviting and managing participants or sharing your screen during a meeting.

- Mute/Unmute: This allows you to mute or unmute your microphone.
- Audio Controls (click the small chevron ^ next to Mute/Unmute): The audio controls allow you to change the microphone and speaker that Zoom is currently using on your computer, leave computer audio, and access the full audio options in the Zoom settings.
- Start/Stop Video: This allows you to start or stop your own video.
- Video controls (click the small chevron ^ next to Start/Stop Video): If you have multiple cameras on your computer, you can select which Zoom is using, access the full video controls, and select a Virtual Background.
- Invite: Invite others to join your meeting.
- Manage Participants: Opens the Participants window. Polling: Allows you to create, edit, and launch your polls.
- Share Screen: Start sharing your screen. You will be able to select the desktop or application you want to share.
- Chat: Access the chat window to chat with the participants.
- Record: Start or stop a recording of the meeting.
- Breakout Rooms (only available to the host): Split your meeting into smaller groups using breakout rooms
- End Meeting (only available to the host): This will end the meeting for all participants. If you want to have the meeting continue, you should give another participant host control before leaving the meeting.
Before the meeting
- Test your audio and video
- Make sure to choose the correct audio input and output sources and levels
- Make sure to choose the correct camera for the meeting if more than one option is available
- Make sure you know how to share your screen
- Have the content you intend to share prepared ahead of time
Hosting a meeting: helpful advice & best practice
- Mute your mic if others are presenting/speaking
- If there are many participants in a meeting, we recommend that you mute your microphone when you do not need to speak to avoid any unwanted noise or interruptions. When the microphone is muted and the Zoom-application is marked as the chosen application, you can press the space bar on your keyboard and hold it to unmute the microphone while you talk. After you let go of the space bar, the microphone will be muted again.
- For larger meetings and lectures consider making someone your co-host
- A co-hosts can assist with administrative tasks, such as muting or unmuting participants, starting or stopping a participant's video or managing the participants.
Further reading
- Share your screen during a lecture or meeting
- Recording your meeting or lecture
- FAQ ¨C Frequently Asked Questions
- For larger meeting and lectures:
Call us
Opening hours are weekdays from 08:30 to 17:00 and Saturdays from 10:00 to 15:00.
Phone number: 22 84 00 04
Book a Zoom meeting
Students and employees can book a Zoom meeting with UiO Helpdesk. Available hours are Tuesday to Thursday between 11:00 and 13:00.
Book a video call